OUR TABS

Thursday, March 31, 2016

Check Out Our New Code From Twist Braid Snap

Welcome back everyone!!! 

We have some amazing news to share with all of you!!  We have a brand new coupon code from our sponsor Twist Braid & Snap


Use our coupon code "CARAMEL" and you will receive 20% off everything at www.TwistBraidSnap.com (except sidewinders).  Coupon Code is only good through April 7th, 2016 and cannot be used in combination with any other code. 

Twist Braid Snap started with a goal of providing a variety of children's hair accessories at a great price. Their children’s hair accessories include hair snaps, ballies, barrettes, headbands, hair beads, including the squeeze beads and more.  Whether you have curly, wavy, straight, thin, thick or course hair we have the perfect hair accessory for you.  They stock a full line of children's hair accessories.  

AND WHY STOP THERE... they also have shirts !!  Below are the links to the shirts they have available now for purchase, but they are only available for the next few days, so make sure you place your order NOW!  

To order this amazing shirts click on the links below: 


Wednesday, March 30, 2016

"Savage" By Sinful Colors Profesional

Hey there my beautiful people!! 

Yes, this is another post on our series of "Our Favorite Spring Color Nail Polishes" .   If you missed that post, just click on our "Featured Post" link!
 >>>>>>>>>>>>>>>>>>>>>>>>>>>>>>>>>>>>>>>>>>>>>>>>>>>>>>>>>>>>

I'm determined to step out of my comfort zone and try new things by adding more bright color items to my wardrobe and also to my nail polish collection. 

If you have not figure it out yet, you probably will soon.... I am a nail polish fanatic and Sinful Colors Professional are by far my favorite line of nail polish.  They are affordable, durable and the long brush makes the application of the polish onto my nails a lot easier.   I purchase most of my nail polishes at my local pharmacy for $1.99.   Sometimes they are on sale for as low as $0.99 (sometimes even less if you use your Walgreens card or RiteAid Discount card) With those low prices, Hubby allows me to indulge in my little habit. 

"Savage" #950
  

After I removed my last nail polish, I filed and buffed my nails then I washed my hands thoroughly.


I always apply a Base Coat before applying my color polish.  The base coat I use is also by Sinful Color Professionals.  


As you can see, this polish gives a "matte" or "opaque" finish.  If you are a lover of a matte finish then no need to apply any more coats! Believe it or not, I acquired this color with only ONE coat.  The more it dries, the more opaque it becomes. 


I decided to apply a second coat because some of my nails didn't have an even finish.  The color didn't change by much after applying a second coat.  It dried pretty quickly and it was very easy to tell once it was completely dried.  


I like my nails to have that glossy finish.  Therefore I used Top Coat by Sinful Colors Professionals.  

I am truly amazed by the quality of these products.  Even if you have to purchase a base coat, color polish and the top coat polish.  You can do it all, for less than $7.00 and  your nails can look beautiful all the time.


Give them a try, you won't regret it... Share your thoughts with us on the comments below! We would love to hear your opinion. 

Tuesday, March 29, 2016

It's Taco Tuesday! An Easy and Quick Recipe


Hello Everyone!! 

Who doesn't love tacos??  Every one loves tacos in our home and when I inquire about what they would like to have for dinner, my kids' first choice it's tacos!! 

I love taco nights because it is an easy meal to prepare and dinner can be served withing forty-five minutes.  The other advantage of this meal is every one can assemble their own tacos. 

Ingredients: 

1.5 lbs of Ground Breef; 
1 tsp of Onion Powder;
2 Envelopes of Taco Seasoning; and
8 oz of Pace Picante Sauce (Mild) 


*Place the ground beef on your skillet, add the onion powder and the two packets of Taco Seasoning;  Mixed well by hand or with a spoon.  

*Cook your ground beef over medium heat;  
*Stir the beef until it crumbles and is no longer pink.
* add the Pace Picante Sauce, stir the meat and sauce to make sure it's distribute it evenly. (Note: I use Mild instead of hot because of the kids) 


*lower the heat to Low, cover and simmer for approximately 15 minutes. 


I normally let my taco meat simmer until I'm done chopping all of my toppings and every thing is ready to be served.

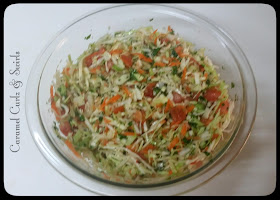
Now that the taco meat is simmering on low and gathering all those nice flavors.  It is time to chop our toppings and make one of my kids' favorite topping, "cabbage salad".

Cabbage Salad is one of my grandmother's recipes and I have always loved it, it is crunchy, healthy, and I can pretty much pair it with any meal.  Yes, you can say I'm addicted to it!! You can add jalapeno and make it spicy or you can add mayonnaise and make it into a different type of cole-slaw.     


For the cabbage salad you will need: 


  • 1/2 medium head) cabbage, thinly sliced
  • ¼ cup fresh lime/lemon juice
  • 1 teaspoon salt, a pinch of red pepper flakes
  • 1 tomato, diced
  • 1 medium carrots, shredded
  • ½ cup yellow onion, diced
  • ½ cup cilantro, chopped
Add the lemon/lime juice to your bowl, add your diced onions, finely chopped cilantro, (jalapeno is optional), diced  tomatoes, shredded carrots and finely chopped cabbage. 

Mixed well, cover and placed it in the refrigerator to keep the salad nice and cold.


I make different toppings for my family because every one likes their tacos a certain way, with certain toppings and certain taco shells and/or tortillas.  

While I bake the kids' taco shells, I'm also frying my tortillas chips to make my delicious nachos, and the tortillas shells my husband likes to eat.  


This meal is easily done under 45 minutes.  The time consuming part for me is preparing the cabbage salad since it requires more than just two ingredients.  It takes me approximately fifteen minutes to prepare the salad.  Chopping the lettuce and dicing the extra tomato for my husband takes no longer than five minutes.

On the picture above you can see the different shells and toppings we use.  Well, I did forget to take a photo of the shredded cheese and the extra salsa my husband likes to add on top of his tacos. 


HOMEMADE NACHOS 


For my homemade nachos, I use corn tortillas and cut them in fours. 

I add Vegetable Oil to my skillet and let the oil get hot; 
I then carefully fry my tortilla chips. (if you have a deep fryer, it's even better)


Sprinkle some salt (seasoned salt) to the tortilla chips and mixed well to make sure the tortillas are evenly coated.

Place some chips on a plate;
Add Taco Meat;
Add Cabbage Salad and your dinner is done! 

Please don't let me stop you there, you can add as many topping as you like, cheese, jalapenos, or even avocado..


Do you have your own special, easy recipe that your family loves? Share your photos and comment with us, below! 


Monday, March 28, 2016

Product Review: Dark & Lovely Au Naturale Moisture LOC Line

Hello my lovelies!! 

Wow, can you believe it??  Easter has come and gone in a blink of an eye and due to the amount of rain we received, the Easter Egg Hunt at our Church was not the only event canceled this weekend. 

In fact, today's baseball practice has also been cancelled. We experienced close to 4 inches of rain during the weekend, making Easter Sunday the wettest day in March for Savannah since March 5th, 1959!!  Mother nature did not get the memo, "it is not supposed to rain on Easter Sunday"!!

Nevertheless, Ms. Bree's hair was perfect thanks to the products from Dark  Lovely Au Naturale Moisture L.O.C. Line... 


I purchased these items at my local hair store, every single product was $9.99 including the small bottle of oil.  I highly recommend you shop around first.  I wish I would have known, but Target has them at lower price!! 

The Products I used are:


Step 1:

Step 2:

Step 3:

Step 4:
To keep her hair shiny, I used the Dark and Lovely Au Naturale Nourishing Shine Nectar 5.75 oz and I can use it as often as needed.  


This time I did not used their Sulfate Free Cleansing Shampoo or the Deep Conditioning Delight.  But I will use them in her next washing session and will be posting our review once we do.  

Dark & Lovely Au Naturale Moisture L.O.C. line has been on the market for over a year. This is our second time using them and they did not disappoint me on either occassion.

Their entire line is infused with Coconut & Moringa Oils.  While I'm very well acquainted with the use of coconut oil, this is the first time I use a product with Moringa Oils. 

Moringa Oils comes from the seeds of Moringa Oleifera Tree.  Want to know more? Read this article about the Benefits of Moringa Oil for Skin, Hair and Health.

DURING OUR FIRST TIME:


How I used these products: 

I applied the Leave In Spray to freshly washed and detangled hair.  I highly recommend working in small sections.   Ms. Bree's Hair was divided into 8 sections. 

After applying Leave In Spray, I applied the Soak It Up Oil Cocktail followed by the Lock It Up Sealing Cream. 

As you can see on the picture above, I braided her hair instead of our usual Two Strand Twists. 


After three days or so, I unraveled her braids and her "braid out" was amazing! "Full and Fluffy!"

The scent of these products are amazing and they all go very well together.  The scent is not overpowering at all and it mellows out even more after a day or so. 

SECOND TIME USE

During our second time using these products, I followed the same L.O.C. technique.  Using the same products in the same order:

a. Leave In Spray, 
b. Soak It Up Oil Cocktail, and 
c. Sealing It Up Cream

This time, Ms. Bree has two pony tails on the front and medium size box braids on the back. I styled Ms. Bree's hair on Friday and it still looked amazing on Sunday Morning. Even with all the rain and humidity, she had no "fly aways" or "frizz". 

The "pros" of these products are: 

*They can be found at many stores;
*They do exactly what they claim;
*The prices are not extremely high.  They are a great alternative to any expensive hair product. 

The cons... uhmm well, the only thing I COULD find that can pose as a problem, is that they are NOT all natural but they are the next best thing as a "all natural" product.  I have not seen any signs of bumps, itchiness, flakiness, or product build up on her scalp.  

Overall, I like these products, and while some of my favorite are highly priced, these will definitely work as an alternative for those "dry" days. (By dry days, I mean those days when we really don't have a lot of cash laying around to spend on hair products).

I am considering trying more products from this line like Coil Moisturizing Souffle and Easy Twist Gel N Butter..... 

Have you tried any of these products?  Give them a try and let us know your thoughts.


Sunday, March 27, 2016

Happy Easter

Hello everyone and Happy Easter Sunday!!  

Although we are experiencing a rainy day today, it didn't stop the kids from having fun at Church. 

It was so amazing to see the excitement in her eyes this morning.  


Even if you are not religious, come and join us in this special day by sharing all of your Easter photos with us!!


May you find the renewal of hope,
health, love and the Spirit of God. 

Happy Easter to every single one of you and your families!


Saturday, March 26, 2016

Easy Spring Crafts for Kids- Project 3: Easter Egg Wreath

I just love spring and the many activities we can do during this time with our kids.  As I mentioned on our first post, I love spending quality time with our children which is very important to me.  

Ms. Bree knows how much I enjoy making new wreaths for our home.  Therefore, she wanted to make one for her room.  Instead of buying all the materials I would normally buy to make a wreath for our front door, I decided to buy this pack of 30 Foam shapes. 


All Easter theme items are on sale at 50% off their regular price at our local crafting store and the final price for the foam shape pack for $4.79.  They already have the "egg" shape we need and the pastel colors are perfect for this project.


PROJECT 3
EASTER EGGS WREATH  

Unlike the last two projects, your little ones are going to required a little bit more of your help, specially with the assembling of the wreath.

What you will need to have: 

13 Oval Shape Foams (or Easter theme scrapbook paper);
Glue;
Markers; and
Piece of Ribbon

First thing to do is to ask your child how big they want their wreath to be.  I used thirteen (13) shapes to create ours.  


The next step is to decorate the oval shapes.   You can use markers and draw lines, circles, flowers, whatever design your little one wants to have or you can print Easter Eggs Coloring pages, color, cut and paste them onto your shapes. 


Once the shapes are decorated to the satisfaction of your little artist, it is time to assemble the wreath. 


You will need two pieces of ribbon of you choosing.   Make a bow using your first piece of ribbon and glue it to the front.  


Add the second piece of ribbon to the back of your wreath to hang it and now you're all done!!   


There it is ladies and gentlemen.... for less than $5.00 your little one can create his or her own Easter Theme Wreath!! 

Happy Crafting and stay tuned for our next Easy Spring Crafts for Kids!!  

Friday, March 25, 2016

Easy Spring Crafts for Kids- Project 2

Hello everyone and welcome to our second post on "Easy Spring Crafts for Kids".


PROJECT #2
Colorful Mini Flower Pot   


First, let me start by giving all of you an update on Ms. Bree's condition.  Yesterday was our follow up appointment with Dr. Oliver, ENT.  I'm happy to share that she is recovering nicely and has been given the "green light" to ease herself into her regular activities.  However, her desire to jump on the trampoline is going to have to wait a few more days.  Ms. Bree is back at school today and she was beyond excited! Thank you for all the prayers, positive vibes, and well wishes!  We truly appreciate your support. 

Now, let's start with our second easy spring craft for kids made by kids.  This craft is not only easy and fun to make but it will be easy on your wallet as well.  

You will need the following: 

1. 2 3/4 inch Clay Pot........$1.29
2. Outdoor Paint................$0.79
3. Soil...................................Free
4. Flower seeds pockets...$0.89
5. Stickers...........................Free


Let your little ones paint their miniature pots, once they have finished their master piece, set the pots aside for drying. 

After their clay pots are completely dry, it is time to DECORATE as much or as little as they want to!!  


I wish she would have let me apply a couple of more coats of paint to the pot in order to give it that nice bright neon pink color.  But it was not my project, it was hers and she loved the pot just the way it is.. if she is happy then I'm happy.

So there it is ladies, for less than $3.00 you are guaranteed an hour of quality time and you will be coolest mom ever! :)

Happy crafting! 


Wednesday, March 23, 2016

Easy Spring Crafts For Kids- Project 1

Welcome back everyone! 

To continue with our Spring and Easter theme this month, we have quiet a few easy crafts that you can do with your little ones while at home.  

Instead of writing a very long post, we've decided to break our Easy Spring Crafts for Kids into a series of small posts.


Project #1
Colorful Picket Fence & Flowers


These beautiful picket fences are easy to make by using things our children love to play with:

a.  "Popsicle" sticks
b.  Glue
c.  Kids' paint and
d.  Foam stickers. 

Possibilities are, you already have some these materials are home, like the paint, popsicles sticks and glue.  The foam stickers can be found at any store for less than $2.00! 

This project guarantees to give you some quality time with you little ones and it WILL NOT break the bank... this is what I call a "win-win".

The only messy part of this project is the painting of the popsicle sticks.  


Once the sticks are completely dry, it is time to glue them together.  Remember, the fence can be as long as the kids want them to be.   I always tell my kids, "Sky is the limit here"!

Once the sticks are glued in place, it is time to decorate!  You can easily display these pieces of art by sticking them onto your refrigerator or add a piece of ribbon onto to the back so that kids may hang them. 


Happy Crafting and don't forget to share with us your master pieces!!!